
Short answer: Google Forms works well for free, single-session events where you only need a list of names and emails. Start from the Event Registration template, collect only the fields you will use, turn on email collection and response receipts, link the form to a Google Sheet, and close the form by hand when you are full. Once you need payments, ticket types, automatic capacity limits, branded confirmations with a ticket, or check-in at the door, you are no longer running a form. You are running registration, and that is the point to move to a registration platform.
Google Forms is free, familiar, and quick to share, which is why so many first events start there. It is also a general survey tool, so every event-specific job (confirming a seat, stopping sign-ups at capacity, knowing who actually arrived) becomes a manual task for someone on your team. This guide shows how to set up a Google Forms event registration properly, which settings matter, and the clear signs that it is time to upgrade.
Is Google Forms enough for your event?
| Your event | Google Forms fit | What to watch |
|---|---|---|
| Free workshop, meetup, or internal session under a few hundred people | Good | Close the form manually at capacity; send reminders yourself |
| Free event with several sessions or tracks | Workable with sections and branching | Session headcounts live in a spreadsheet you have to maintain |
| Paid event or several ticket prices | Poor | No built-in payment, so you reconcile payments against form responses by hand |
| Limited seats, approvals, or a waitlist | Poor | No automatic cap or approval queue without add-ons |
| In-person event with check-in or badges | Poor | No tickets, QR codes, or arrival tracking |
How to set up event registration in Google Forms
1. Start from the Event Registration template
Open Google Forms, choose Template gallery, and pick Event Registration. Rename the form to the exact event name and put the date, time, time zone, location or joining instructions, and a contact address in the description. People forward registration links, so the form should make sense to someone who has never seen your invitation.
2. Ask only for what you will use
Every extra question costs completions. Keep name and email, then add only the fields that change something you do: session choice, dietary needs, accessibility requirements, company or role if you report on it. If a field will never be read, remove it. Our breakdown of why attendees abandon registration forms covers the most common causes.
- Mark the fields you truly need as Required.
- Use Response validation on short-answer fields such as email or phone to catch typos.
- Use dropdowns or multiple choice for session and meal options so the answers can be counted later.
3. Use sections for different attendee types
If speakers, sponsors, and attendees need different questions, split the form into sections and use Go to section based on answer on a multiple-choice question such as “I am attending as”. Each group sees only its own questions, and the form stays short for everyone.
4. Turn on the settings that protect your data
- Collect email addresses so every response has a reliable contact.
- Send responders a copy of their response so attendees have a record of what they submitted. This is a copy of their answers, not a ticket.
- Limit to 1 response reduces duplicates, but it requires respondents to sign in with a Google account. Many attendees will not have one or will not want to use it, so test this before you rely on it.
- Write a clear confirmation message: what happens next, when they will hear from you, and who to contact.
5. Link responses to a Google Sheet
From the Responses tab, link the form to a new spreadsheet. This sheet becomes your attendee list. Add your own columns for status (confirmed, cancelled, paid, attended) and protect the response columns so nobody edits submitted data by accident. Turn on email notifications for new responses if someone needs to act on each sign-up.
6. Share the link, embed it, or print a QR code
Use the Send button to copy a short link or the embed code for your website. For posters or slides, turn the short link into a QR code with any QR generator, then scan it from a phone to make sure it opens the live form.
7. Close registration when you are full
Google Forms does not stop at a set number of responses or at a closing date on its own. Watch the sheet and switch Accepting responses off when you reach capacity, or install a Workspace add-on that closes the form automatically. Update the closed-form message to tell late visitors what to do instead.
Google Forms event registration template: the fields that matter
Whether you start from the template gallery or a blank form, this field set covers most events without overloading people:
| Field | Type | Required? | Why |
|---|---|---|---|
| Full name | Short answer | Yes | Name badges, attendee list |
| Collected automatically | Yes | Confirmations and updates | |
| Phone | Short answer with validation | Only if you will call or message | Day-of changes |
| Organization and role | Short answer | Optional | Audience reporting, networking |
| Attending as | Multiple choice (branches to sections) | Yes, for mixed audiences | Shows the right follow-up questions |
| Session choice | Checkboxes or dropdown | If you have sessions | Room planning |
| Dietary and accessibility needs | Checkboxes plus “Other” | Optional | Catering and venue setup |
| Consent to event communication | Checkbox | Yes | Permission to send updates |
Where Google Forms starts to cost you time
None of these are flaws in Google Forms. It is simply built to collect answers, not to run an event. The work shows up in your spreadsheet instead.
- Payments: there is no built-in checkout. You send people to a separate payment link and then match payments to responses by hand, and some people register without paying.
- Capacity and waitlists: nothing stops sign-ups at your limit, and there is no queue to move people up when someone cancels.
- Confirmations: the response copy is not a ticket. There is no QR code to scan, no calendar invitation, and no automatic reminder sequence.
- Different ticket types: early-bird, member, and student prices each become another question or another form, and the totals live in formulas you maintain.
- Event day: checking people in means searching a spreadsheet on a laptop at the door, and attendance is only as accurate as whoever ticks the boxes.
- Updates and changes: if someone needs to change their session or cancel, they email you and someone edits the sheet.
Signs you have outgrown Google Forms
- You are charging for tickets or offering more than one price.
- You have a hard seat limit and have already had to turn off the form in a hurry.
- More than one person edits the attendee spreadsheet and versions are drifting.
- You need attendees to show something at the door.
- You are sending reminders and confirmations by copying emails out of the sheet.
- You want to know who registered versus who actually attended.
If two or more of these sound familiar, compare platforms on the full journey rather than on the form builder alone. Our guide to choosing an event registration platform lists the questions to ask in a demo.
What changes when registration moves into EventHex
EventHex publishes this guide, so here is what EventHex event registration does for each job that Google Forms leaves to a spreadsheet, stated plainly.
| Job | In Google Forms | In EventHex |
|---|---|---|
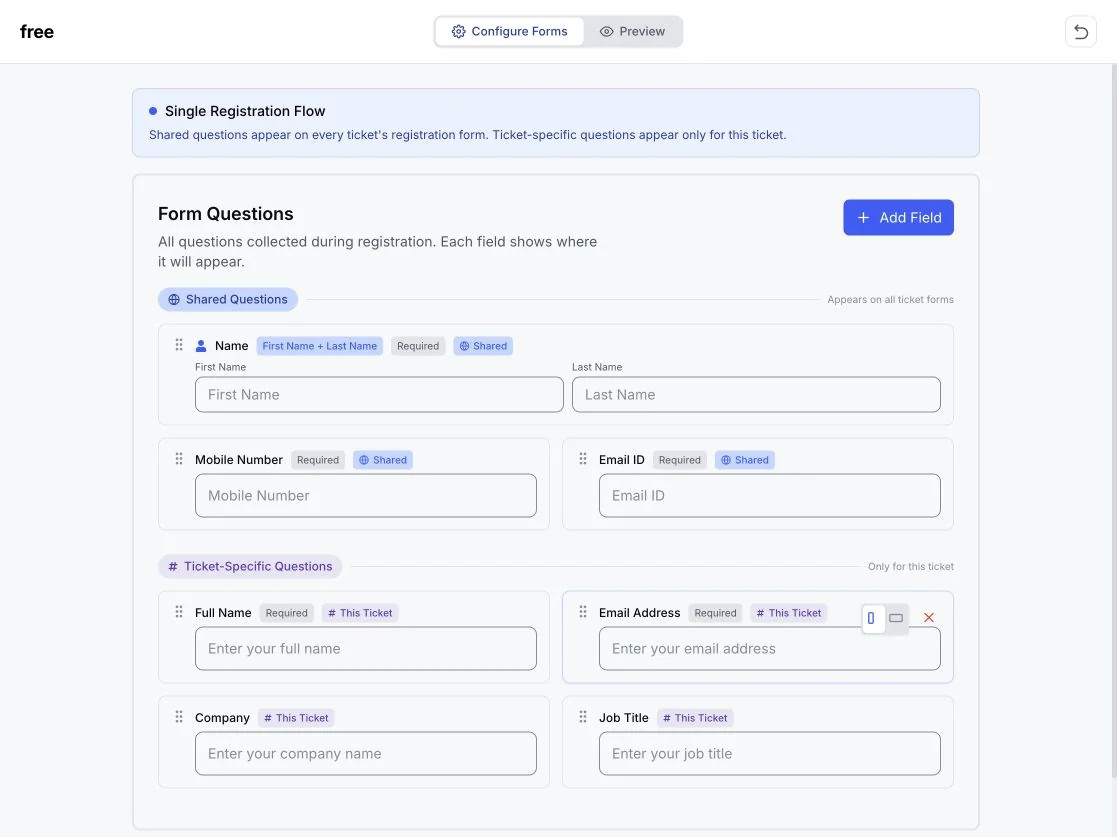
| Questions | Survey question types, branching by section | Text, email, phone, number, long text, dropdown, multi-select, checkbox, date, time, file upload, and URL fields, with a field shown or hidden based on an earlier answer |
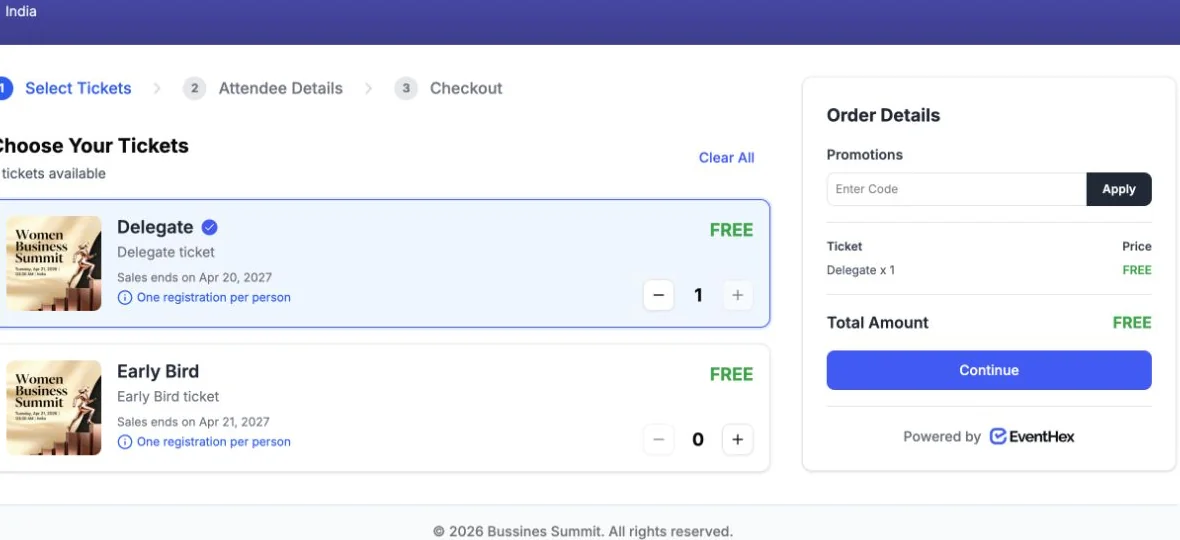
| Ticket types | Extra questions or extra forms | Free or paid tickets, each with its own form, a cap on how many are sold, sale start and end dates, and per-order limits |
| Payment | Separate payment link, matched by hand | Online payment at checkout through Razorpay or Stripe, or offline payment |
| Confirmation | On-screen message and a copy of answers | Automatic confirmation email after registration, with an optional attached badge |
| Approval | A status column you update | Registrations held for your approval, with the option to hold payment until approved |
| Duplicates | Sign-in required, or cleanup in the sheet | Stop the same attendee registering twice for a ticket, or allow a limited number of entries |
| Discounts | Not available | Percentage or flat discount codes with usage limits and start and end dates |
| Attendee list | A shared spreadsheet | A searchable registration list with Excel export |
| Event day | Searching the sheet at the door | QR check-in with the EventHex scanner app, which marks attendance |
You can still share a single registration link or paste an embed code into your own website, just as you would with a form. Ticket rules are covered on the event ticketing page, payment options on event payment processing, and arrival on event check-in. If badges are part of your event day, our badge printing workflow guide picks up where registration ends.
Frequently asked questions
Is Google Forms free for event registration?
Yes. Google Forms is free with a Google account, and responses can be collected in a free Google Sheet. Costs appear elsewhere: payment tools, add-ons for capacity limits, and the staff time spent maintaining the spreadsheet.
Can Google Forms limit the number of registrations?
Not on its own. You can stop accepting responses manually, or install a Workspace add-on that closes the form at a set count or date. Test the add-on before you publish the form.
Can Google Forms send a confirmation email?
It can show a confirmation message on screen and, when email collection is on, send respondents a copy of their answers. It does not send a ticket, a QR code, or a reminder sequence.
Can I take payments with Google Forms?
Not directly. Organizers usually add a link to a separate payment page and reconcile payments against responses afterwards. If most of your events are paid, a registration platform with built-in checkout removes that step.
How do I stop duplicate registrations in Google Forms?
Limit to 1 response prevents repeats from the same Google account, but it forces every attendee to sign in with Google. Many organizers leave it off and remove duplicates in the sheet before the event instead.
Start simple, then move when the spreadsheet starts running you
Google Forms is a sensible first registration tool. Set it up carefully, keep it short, and own the closing date. When payments, capacity, confirmations, and check-in start living in a spreadsheet that only one person understands, move the whole journey into one place. To see registration, ticketing, and check-in working together in EventHex, book a demo.